Maybe you’ve been away from your research due to a lab shutdown, a planned leave, or a sudden emergency. No matter the situation, going back to lab work after time away can be daunting. How do you get organized, set up your experiments, and meet your goals?
To help ease the transition into the lab, we’ve created this 4-step guide to get your experiments up and running
1. Power Up the Equipment
While this issue may seem unimportant, the reality is that improperly powering up your equipment can negatively impact system performance. Here are a few general guidelines to follow:
- Turn on the PC first: Your PC is the ‘brains’ of your microscope system, so remember to power up and log on to the PC as a first step.
- Turn on all components of the system: Depending on your system, the order you turn on components may matter. For instance, the CBH on Olympus systems must be powered on before the TPC. Consult your manual for specific instructions.
- Launch the software: If you encounter errors during the software launch, we’re here to help! Reach out to your local sales representative or contact us here for technical assistance.
2. Prepare for Imaging
Once your equipment is powered up, take the time to properly prepare, load, and level your sample for imaging. Here are some helpful tips:
Preparing the Sample
First, select the appropriate coverslip. Coverslips should be #1.5 or .17 mm thick (170 µm). Olympus objectives that are designed for coverslips need the right thickness for good image quality. If the coverslip is too thick or too thin, optical artifacts can occur.
Make sure to verify your coverslip thickness and use standard glass slides. For some applications, plastic slides are acceptable. But in fluorescence imaging, plastic is very autofluorescent. This causes strong background in blue and green channels, and sometimes in the red channels.
Cleaning the coverslip and slide before imaging is also important. A good cleaning solution is 70% ethanol in distilled water. Another option is an optical cleaner, such as Sparkle Optical Lens Cleaner by A.J. Funk and Co.
When cleaning optics, always use lens paper. Facial tissues or lab tissues are abrasive and can damage optical surfaces.
Loading the Sample
Next, load the prepared sample in the correct orientation for your microscope. Always load coverslips facing up on an upright microscope and down on an inverted microscope.
With inverted microscopes, it is important to check that your sample is well sealed. If the sample isn’t well sealed, liquid can make contact with your objectives or objective nosepiece. This liquid may corrode or oxidize optical coatings, optical glue, or other parts of the microscope hardware and electronics.
When loading the sample, pay special attention to the objective’s working distance. In simple terms, the working distance is how close the objective must be to focus on the specimen. Working distances can vary from a little more than 100 µm to several millimeters.
Need to find your objective’s working distance? Just check the inscribed specifications or our online objective catalog.
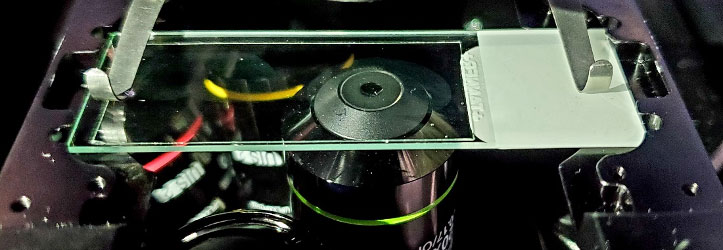
Figure 1. Inverted microscopes require slides to be loaded upside down. A common mistake is to load slides with the coverslip facing up on an inverted microscope, leading to a blurry image. Always check that optical surfaces are clean and use lens paper to clean these surfaces.
Leveling the Sample
Researchers often don’t need to worry about sample flatness in many situations. The stage is fixed and flat, the sample holder is flat, and the slide is flat.
Yet, in more sensitive applications like confocal microscopy, TIRF, or tiling, the sample flatness is critical. When the sample is tilted, shading can occur. Shading may lead to artifacts when stitching images together or changes in intensity based on its position on the image.
One way to improve sample flatness is through the leveling screws found on some stage inserts. These are typically located in the stage insert’s corners. Misaligned leveling screws are a common source of sample tilt. Backing these screws fully out is a reasonable approach if you’re concerned about sample tilt coming from the stage insert.
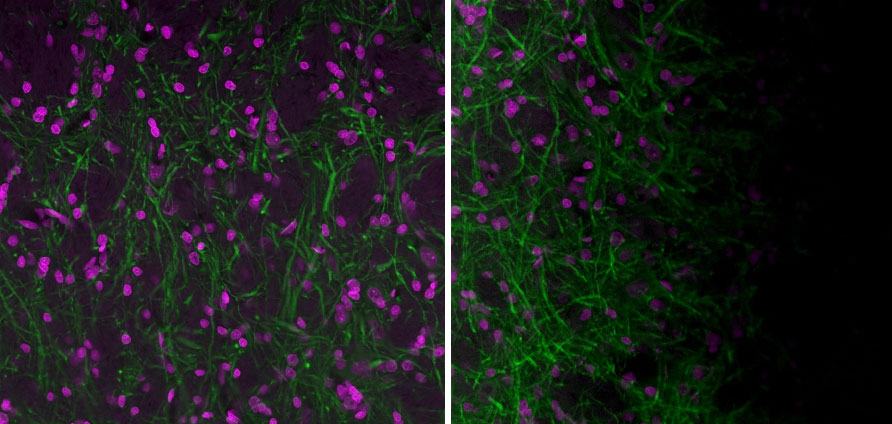
Figure 3. Left: Image acquired with a well-aligned Olympus FV3000 laser scanning confocal microscope and a flat sample. Right: Image acquired with a well-aligned FV3000 microscope but a sample that isn’t flat. It is sometimes difficult to determine the source of the shading. Often, a sample that isn’t flat in the sample holder can cause the shading artifact. Images acquired with a 20X UPlanXApo objective. Magenta is Hoechst and green is MAP2 (MCA-5H11) stained with Alexa 488.
Determining Your Immersion Medium
Olympus offers five major types of objectives: air, water immersion, water dipping, standard oil, and silicone oil. If the wrong immersion medium is used on the objective, the image quality will degrade. Further, damage can occur if oil enters certain parts of an objective that’s not designed for oil use.
For these reasons, it is critical to know the immersion medium designed for your objectives. Our objectives are color coded so that you can easily recognize the required immersion medium and use the correct one.
Also, consider your workflow. You may not want to image at 60X with silicone oil and then immediately switch to a 60X water immersion objective. Mixing silicone oil and water won’t result in crisp images. Further, the slide would need to be removed and cleaned before using water immersion.
Lastly, make sure to use oil from the manufacturer of your objectives since it is designed for your optics.
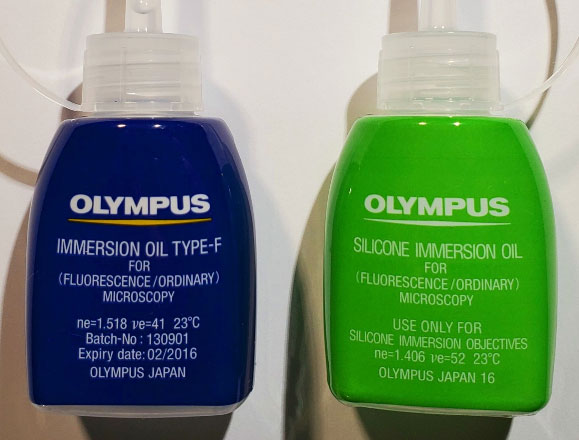
Figure 4. Standard oil or immersion oil type-F (left) and silicone immersion oil (right). Olympus offers many lenses for the standard oil and several for the silicone immersion oil. Making sure to use the correct oil is vital for imaging success. Avoid mixing these two oils on a coverslip.
3. Acquire Images
Now that you’ve prepared your sample, you can move on to the image acquisition step. Here are some useful tips for image capture:
Best Practices for Acquiring Images
When acquiring images through confocal or widefield fluorescence microscopy, using low illumination and higher detection sensitivity or gain is usually preferred. This reduces harmful laser or arc lamp irradiance that causes photobleaching and changes in biology.
Certain ion channels and death pathways can be activated by excitation light. Yet, enough illumination must be used to produce an image of adequate quality. High illumination can generate a beautiful image. Consider how to balance light for excitation and light for detection and the final experimental goal.
Correction Collar
Some of our objectives have a correction collar. These can be confusing to use without proper training. General guidelines include:
- Use 0.0 for no coverslip or 0.17 for #1.5 coverslips.
- Verify if the correction collar is marked for temperature. Some objectives have differing scales depending on the room temperature or 37 °C (98.6 °F). Set the correction collar, begin imaging, and optimize the correction collar while maintaining focus for image brightness. This last step requires patience and practice. If optimization is impossible, then stay close to the correction collar general marks of 0.0 or .17 as a first step.
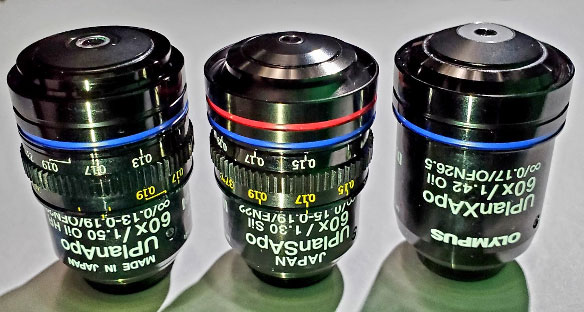
Figure 5. Three 60X objectives. The 60X UplanXApo objective (right) uses standard oil and doesn’t have a correction collar. The 60X UplanApo oil objective (left) uses a correction collar set to 0.17 (#1.5 coverslips). The 60X UPlanSApo (center) uses silicone oil and the correction collar is set to 0.17 (#1.5) at 37 ˚C (98.6 °F). Optimizing the correction collar position can be key to achieve a sharp image.
Condenser Alignment
If fluorescence is your primary application, the condenser may be unused during normal microscope operation. In this case, use the condenser knobs to move the condenser away from the sample.
If you plan to use brightfield, phase contrast, or DIC imaging, the first step is typically to verify the condenser alignment. In brightfield mode, focus on the sample and then close the field aperture to visualize the condenser leaflets. This process is most easily done at 10X or 20X magnification.
If the condenser’s leaflets aren’t sharp or centered, please align the condenser in height and/or centration by performing Köhler illumination. To find info on aligning the condenser by Köhler illumination, visit our online Microscopy Resource Center.
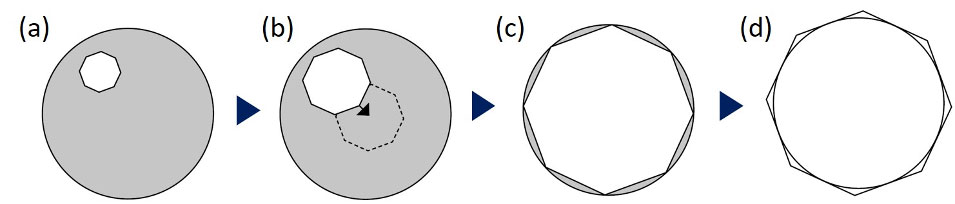
Figure 6. Condenser alignment procedure: (a) close the field aperture, (b) centralize the aperture leaflet center, (c) confirm the precise center, making the leaflet inscribed to the edge of the field of view, (d) then make the leaflet circumscribed.
File Sizes
Microscope files can be quite large. Yet, certain measures can be made to streamline the file sizes. For instance, if you don’t need data, the idea of imaging everything “just in case” can actually make life harder.
Image what you need, with the resolution, bit depth, and field of view you need. Avoid imaging more or less than what you need, since having larger than necessary files creates an unwanted burden on data storage and data processing.
Storing Files
Save files as soon as possible. Computer and hard disk drive crashes can occur at any time, so save to more than one location.
Please use caution when using a USB thumb drive or external hard disk drive. These are prone to infection and can spread the virus or malware from computer to computer.
It may not be immediately obvious that an infection has occurred on an imaging system PC. The system may be sluggish or randomly crash. Many imaging systems don’t have antivirus software to prevent it from reducing system performance. As a result, imaging system PCs are easier to infect.
To mitigate these risks, please scan external storage drives before connecting them to the imaging system PC.
File Formats
Olympus uses proprietary file formats, such as OIR, OIF, VSI, and OIB. These formats:
- Offer uncompressed full-resolution images
- Maintain file architecture appropriate for the Olympus imaging system
- Record metadata from the imaging parameters
FIJI/ImageJ can open these Olympus files with the proper plugins installed. We recommend you maintain images in the Olympus file formats when possible but understand that exporting the files to TIFF, JPEG 2000, or other formats is sometimes necessary.
Please take note of any possible compression or reduced resolution that can occur by export file options or by image file type. Avoid using JPEG images, as the images are often compressed, and data loss often occurs.
4. Shutting Down the System
Shutting down your system correctly is just as important as proper startup. Here are some best practices:
Cleaning the Microscope System After Use
When imaging is complete, cleaning up is not only the courteous thing to do, but it also prevents damage to the hardware.
For instance, standard oil for oil immersion objectives can dry up and harden if left on objectives. Oil that has been left out for days is difficult to clean and may even run onto other microscope surfaces. Learn how to clean objective lenses by reading our resource, 6 Tips to Properly Clean Immersion Oil off Your Objectives.
Nail polish from slides or caustic clearing reagents are often found on the microscope stage or imaging area. Please clean these surfaces, especially where liquid or other residues are visible. Commonly touched surfaces like eyepiece lenses, the touch panel control, and focus handles are all possible areas of contamination and infection from one user to the next.
To reduce the spread of viruses, cleaning these surfaces is important. We suggest using 70% ethanol in distilled water on lens paper for the touch panel controller and eyepieces. Make sure to remove the rubber eye cups around the eyepieces to prevent the alcohol from damaging the rubber. Cleaning the stage surface, air table, or worktable with 70% ethanol in distilled water and Kimwipes or paper towels is also recommended.
A good guiding principle is to leave the microscope system in better shape than you found it. Remove any samples from the microscope area after imaging. Most samples are best stored at 37 °C (98.6 °F), room temperature, 4 ˚C (39.2 °F), -20 ˚C (-4 °F), or -80 ˚C (-112 °F). Most slides or dishes are stored to prevent breaking and kept in the dark. Some samples must be returned to the cell incubator.
For more cleaning tips, read our popular guide: How to Clean and Sterilize Your Microscope.
Powering Down the Microscope System
Shutting down the system correctly helps ensure:
- Proper maintenance of the hardware
- The system is ready for the next user
Before shutting down the system, check when the next person will use it. If the system will be used immediately, consider logging out while keeping all remaining hardware on. But if it won’t be used for an hour or more, turning the system off is advised. This reduces the use of lasers, lamps, fans, and other components that must be replaced and serviced based on the hours of operation.
Always exit the software before shutting down hardware components. Turning off a microscope control box before exiting the software, for instance, may result in an error and potential problems for the next user. Remember, the software is like the brains of the imaging system.
Quick Troubleshooting Guide for Returning to the Lab
If you run into an imaging challenge, we’re here to help! Here are a few solutions to common issues a microscopist may experience when returning to the lab:
Challenge #1: My image looks blurry. I can focus the image, but it never looks sharp.
Suggestions: Use lens paper to clean the objectives, coverslip, and eyepieces with 70% ethanol in distilled water. Make sure that you are using #1.5 coverslips. Lastly, check that you are using the correct immersion medium for that objective.
Challenge #2: When I change the objective, I lose focus entirely.
Suggestions: Verify parfocal corrections are set up in the TPC or software when available. Confirm that the objectives are fully screwed in. Check the objective immersion requirements. This includes verifying that the correct immersion medium is being used and that it isn’t being mixed with another medium. It isn’t abnormal to need focus adjustment when moving from low magnification to high magnification. Yet, losing focus when going from high to low magnification likely indicates an issue with parfocality.
Challenge #3: When I look at my fluorescent images, the image is bright on one side and dark on the other. I don’t think this is correct.
Suggestions: First, verify that this pattern of bright on one side and dark on the other remains when you translate the stage or sample in XY. If the pattern remains, consider that the sample may not be flat. If the sample appears flat, the laser or arc lamp may be misaligned. If you suspect the problem is the laser or arc lamp, please contact us for support before trying to align the fluorescence excitation light path. Reach out to your local sales representative or the Olympus Technical Assistance Center.
Challenge #4: When I open my images in other software, the images don’t look as nice as when I open them in the Olympus software.
Suggestions: Can you open the files on another installation of the Olympus software? Keeping within the Olympus software solutions is the most convenient way to maintain resolution or metadata information. If the analysis software requires TIFF or another generic file format, then use raw, full-resolution TIFF files. These raw TIFF files often appear black unless opened with imaging software. Also, some Olympus software interpolates when zoom is applied to the image. Not all software interpolates the pixels when enough zoom is applied. This can sometimes make images appear different in Olympus software than FIJI/ImageJ.
Challenge #5: My lab has been using #1 coverslips for years, and we have many cases of them in the lab. How important is it for us to change to #1.5 coverslips?
Suggestions: Olympus objectives are designed for #1.5 coverslips unless they are water dipping lenses. Optical artifacts will occur if there isn’t enough glass between the objective and specimen. The extent to which this matters depends on the experiment and the imaging requirements. Regardless, your images won’t be as resolved as they could be, and imaging isn’t optimal. We recommend changing to #1.5 coverslips as soon as possible.
Related Content
Remote Microscopy Guide: 6 Tips to Set Up Your Lab for Success