Exposure and color balance errors are perhaps the most common problems that occur with color photomicrography and have been encountered by all microscopists, both amateur and professional alike. Usually, the source of the error is immediately obvious or can be easily determined by retracing the steps leading to exposure of the photomicrograph.

Other similar errors, such as reciprocity failure, condenser aberrations, and unexpected color shifts are less obvious and may often take some extensive troubleshooting to uncover the source. The lack of proper color temperature balance between the microscope light source and the film emulsion is one of the most common reasons for unexpected color shifts in photomicrography. If the color temperature of the light source is too low for the film, photomicrographs will have an overall yellowish or reddish cast and will appear warm. On the other hand, when the color temperature of the light source is too high for the film, photomicrographs will have a blue cast and will appear cool. The degree of mismatch will determine the extent of these color shifts, with large discrepancies leading to extremes in color variations.
Figure 1 presents a photomicrograph of a multiply stained thin section of alfalfa plant tissue that has been infected with the crown wart fungus, Physoderma alfalfae, showing several common exposure and color balance errors. Underexposure and overexposure, two errors that occur quite frequently, are illustrated in the left-hand portion of Figure 1 as dark and light areas in the photomicrograph. The central right-hand portion of the photomicrograph demonstrates a common shift in color that can occur for a variety of reasons. Color balance errors are represented by bluish and yellowish areas of the film, which are due to improper color temperature arising from the use of either tungsten film with a daylight source or daylight film with a tungsten light source. These and other similar errors, such as the use of specimens that are too heavily stained or too thick, represent the most frequent errors that confront a microscopist during routine photomicrography. The following paragraphs address specific errors and faults in exposure and color balance of photomicrographs and present suggested remedies.
Color Balance Errors - The test of properly balanced microscope illumination, matched to a film's emulsion design, is to have the clear background of a photomicrograph appear white. A bluish background indicates too high a color temperature, while a yellowish background signifies too low a color temperature. This concept is thoroughly discussed in the color temperature section of the Olympus Microscopy Resource Center Microscopy Primer.
Using a film that has not been correctly balanced for the light source color temperature in photomicrography can lead to unusual color shifts, resulting in unnatural hues that do not faithfully reproduce the colors seen in the microscope eyepieces. The photomicrographs presented in Figure 2 demonstrate the proper use of color balance filters between film emulsions and microscope illumination sources. In the center (Figure 2(b)) is a photomicrograph of a thin section of apple tree stem infected with apple scab, a destructive disease of apple trees caused by the fungus Venturia inaequalis.
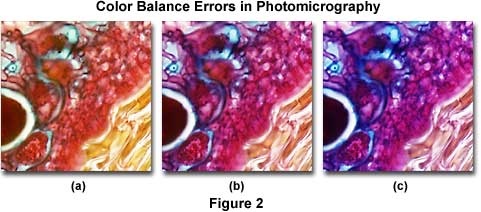
The specimen was stained with a quadruple mixture designed for plant tissue and photographed using a 3200 K tungsten-halogen light source with Fujichrome 64T, a tungsten-balanced transparency (reversal or slide) film. On the left (Figure 2(a)) is the same viewfield photographed using Fujichrome Velvia, a daylight-balanced film, but with the same 3200 K tungsten-halogen lamp. Note that all hues are shifted to longer wavelengths and the overall image has a definite yellow cast. The photomicrograph on the right (Figure 2(c)) was produced with the same microscope, but using a daylight-balanced flash tube for a light source, and Fujichrome 64T transparency film. Under these conditions, the image has an overall bluish cast and appears very "cool". The proper film choice for Figure 2(a) would be Fujichrome 64T (tungsten-balanced) and for Figure 2(c), it would be Fujichrome Velvia (daylight-balanced).
Most microscopes are equipped with a tungsten-halogen lamp that can be set to yield a color temperature close to 3200 K (to match the color balance of indoor Type B films), but not to the higher color temperatures suitable for daylight balanced films. In order to produce light simulating daylight quality, a color conversion filter must be placed in the light path. The most common conversion filter (producing large increments in color temperature) is the Kodak 80A filter, which converts light from 3200 K to 5500 K. For Olympus microscopes, the equivalent daylight-balanced filter is called the LBD filter, and for Nikon microscopes the filter is termed the NCB filter. Always use one of these filters when conducting photomicrography with daylight-balanced films under tungsten (3200 K) illumination. Other filters are useful for decreasing the color temperature or for making small incremental changes, as reviewed in our discussion on the effects of color temperature in photomicrography.
Smaller adjustments to color temperature are made with "fine tuning" filters, commonly called color compensating or color balancing filters, which produce incremental changes of 100 K to 600 K in color temperature. A variety of filters are commercially available to assist the photomicrographer in compensating for optical and illumination problems in order to obtain the highest quality images possible. Many photomicrography color shifts or casts can be cured by inserting the appropriate Kodak Wratten color compensating filter into the optical pathway. Other filters, such as neutral density, contrast enhancement, ultraviolet absorption, heat absorption, infrared, and filters designed to assist in enhancing details revealed by biological stains are commonly used in photomicrography. These filters may require compensation to avoid producing color shifts in color photomicrographs.
Exposure and Color Balance
Explore how exposure settings and color compensating filters can be adjusted to change the contrast, brightness, and color balance of a photomicrograph.
Critical photomicrography dictates that color compensating filters be used for careful control of color shifts, which may vary in any one of the six primary colors: red, green, blue, cyan, magenta, and yellow. Most often, film batch variations are first apparent when observing the background colors on new photomicrographs. This color should be a neutral white, and color shifts are usually very obvious when they occur. It is a simple matter to correct the color shift with color compensating filters by using a filter complementary to the color shift present in the background. When undertaking a heavy photomicrography load using color film, it is wise to purchase film that has the same emulsion number on each roll and store the excess in a refrigerator or freezer. A test roll can then be used to determine color balance variables, which should remain constant for the rest of the film batch. The recommended procedure is to expose a single frame with no compensating filter, followed by frames exposed through each of the Kodak Wratten CC10 series filters (CC10R (red), CC10G (green), CC10B (blue), CC10C (cyan), CC10M (magenta), and CC10Y (yellow)). After aligning all seven photomicrographs on a 5000 K light table, the background that displays a clean white or very light gray background is the one that has been filtered correctly. This concept is discussed more thoroughly in our section on Filters for Color Photomicrography.
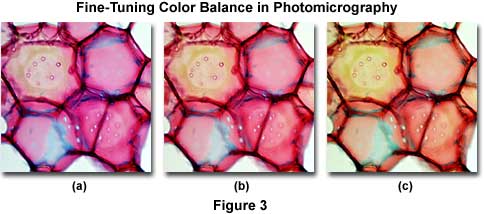
The photomicrographs illustrated in Figure 3 demonstrate correction of color shifts using a stained thin section of plum tree stem tissue infected with Black Knot, a destructive disease of plum trees caused by the fungus Apiosporina morbosa (also known as Dibotryon morbosum). Figure 3(b) shows the image when properly corrected for color casts or shifts. The photomicrograph on the left (Figure 3(a)) suffers from a bluish cast, possibly due to a slight color temperature imbalance. Inserting a Kodak Wratten CC20Y (yellow) filter into the microscope light path shifts the color from that illustrated in Figure 3(a) to resemble the photomicrograph in Figure 3(b). Likewise the photomicrograph in Figure 3(c) has a definite greenish color cast, which can be corrected by the combined use of a CC10M and CC10B compensating filter set.
In many instances, low-density color compensating filters can be effectively used to enhance color rendition in tissue thin sections that are stained with various dyes. Each specimen must be evaluated on a trial and error basis, because overuse of color compensating filters can lead to degradation of complementary stain colors and may render the background with a tint. It is generally advisable to restrict color compensating filters to densities below CC20 when attempting to use them to enhance stain colors.
Thin sections of biological tissue are often stained with one or more organic dyes to selectively enhance visibility of various features present in the specimen. The intensities and hues generated by most biological tissue stains will reproduce very well on color film, but some stains tend to appear washed out or have their colors shifted, especially in multiple stain mixtures. In many instances, color compensating filters can help restore most or all of the lost color, but too much filtration can affect the color of neighboring stained features and the background. This problem occurs with the popular stains eosin, fuchsin, and methylene blue, which are not reproduced very well on most color films. Often, tissues stained with these dyes, either singly or in mixtures, appear muddy and lacking in color saturation.
To counteract this effect, microscopists employ a didymium filter, which contains a combination of rare earth elements dissolved in glass. Didymium filters remove a portion of the orange region of the visible light spectrum, an effect that increases the color saturation intensity of brown, blue, and red-stained features in the specimen. The extinction coefficient is highest between 580 and 590 nanometers for the didymium filter, allowing the filter to remove most of the orange and yellow colors that tend to dull red and blue tones in stained thin sections.
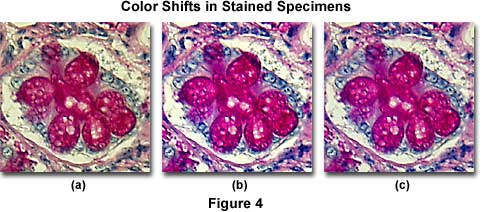
Figure 4(b) presents an image of human colon epithelium tissue stained with a mixture of eosin and hematoxylin, and photographed with a didymium filter inserted into the microscope light path. Note the dramatic increase in color saturation for red and blue color tones in this photomicrograph when compared to the same specimen without the didymium filter (Figure 4(a)), which has an overall yellow cast. An attempt to correct the image using color compensation filters is illustrated in Figure 4(c), where a CC10B (blue) and CC10M (magenta) combination of color compensation filters was utilized to remove much (but not all) of the yellow tint from the specimen. Although the color corrected photomicrograph in Figure 4(c) approaches the quality of that produced with the didymium filter (Figure 4(b)), it still has a slight yellow cast and lacks the rich color quality obtained with the specialized filter.
Didymium Filters
Discover how didymium filters enhance intensities and hues of specimens stained with eosin, fuchsin, and methylene blue in color photomicrography.
In some instances, the background of a biological specimen can become lightly colored during the staining procedure, an undesirable artifact. To avoid this, color compensating filters can be used to subtract the background color, provided it is not too saturated. Another problem with stained thin sections is coloration of the mounting medium. Canada balsam, a popular medium for preparing thin sections, will usually turn light yellow with age or in whole mount specimens. A blue color compensating filter (CC10-20B) will usually overcome this problem, unless the specimen is a very thick whole mount. In this case it may be impossible to completely neutralize the yellow tint.
Tungsten microscope lamps do not emit a significant amount of ultraviolet light, but some of the newer tungsten-halogen lamps, in addition to mercury and xenon lamps, produce a considerable amount of ultraviolet light in the 300-400 nanometer range. Ultraviolet radiation can expose the blue-sensitive emulsion layer in many color films, causing the overall photomicrograph to have a blue cast. This is primarily a problem with fluorescence microscopy, but it can occur in any microscope using a high intensity tungsten-halogen, mercury, or xenon lamp. To reduce ultraviolet light, use the Kodak Wratten 2B or 2E filters that absorb ultraviolet radiation below 390 and 415 nanometers, respectively. The 2B filter will remove essentially all ultraviolet wavelengths, leaving only visible light to illuminate the specimen. Having a wider spectrum of blocked wavelengths, the 2E filter will also remove some of the violet and shorter wavelength blue light, making this filter less desirable for color photomicrography.
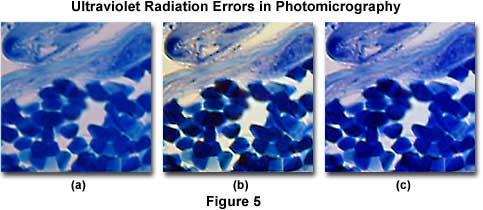
The effects of ultraviolet light on color photomicrography are illustrated in Figure 5. The image on the left (Figure 5(a)) shows a eosin-hematoxylin stained thin section of neural cells in the human medulla. There is an overall bluish-magenta cast to the photomicrograph that pervades most specimen features and the background. After placing a Kodak Wratten 2B filter and a CC10G compensating filter combination into the microscope light path, the center image (Figure 5(b)) was obtained. Note that this photomicrograph demonstrates better color saturation and a cleaner background with elimination of the blue cast. An attempt to correct the color tint error with a CC20Y (yellow) color compensating filter alone is shown in Figure 5(c). Note that the background still has an objectionable blue cast that cannot be completely removed by the filter.
Almost 90 percent of the radiation emitted by a tungsten or tungsten-halogen lamp occurs in the form of infrared wavelengths, which is associated with the production of heat. To compensate for this artifact, heat-absorbing filters can be added to the microscope light path, near the illuminator, to remove unwanted infrared wavelengths and protect microscope optical components, filters, and the specimen from heat damage. Some heat-absorbing filters are made from a special type of Pyrex glass known as Aklo, which absorbs infrared heat rays, and is green or blue-green in color. Filters made with Aklo may introduce color balance deviations into photomicrographs. This undesirable side effect can be corrected with color compensating filters that are complementary to the heat-absorbing filter color. If the heat filter can be removed from the lamp housing, do so and examine it on a 5500 K light table. Light green heat filters can be compensated by a CC10M or CC20M magenta color compensating filter, and blue-green heat filters can be compensated by a light red (CC10R or CC20R) filter. Place the complementary filters on top of the heat filter until one is found that exactly balances the tinge on the heat filter and turns the color to neutral. When inserted into the microscope light path, this compensating filter should alleviate color balance problems. Some of the newer microscopes have dichroic interference filters designed to reflect heat back into the lamphouse. Dichroic filters are far more efficient at blocking heat than quartz or glass heat-absorbing filters, and will not crack or break when a significant amount of heat is absorbed. They are also less prone to cause unwanted color shifts in color photomicrographs.
Condenser Chromatic Aberration - Color balance errors can occur in photomicrography when using Abbe and aplanatic substage condensers, both of which are lacking correction for chromatic aberration. Even when the microscope has been properly configured for Köhler illumination and the condenser and field aperture diaphragms have the correct iris size and position, the image will appear blue or red near the focused edges of the field diaphragm blades. This artifact is due to chromatic aberration and will affect the overall color balance of the image and have a pronounced effect on photomicrographs. Moving the microscope focus slightly up or down will result in a transition of color near the field diaphragm blades that shifts from reddish-yellow to blue as the condenser is translated. Chromatic aberration color-shift artifacts can be successfully removed by proper filtration, but it is impossible to totally eliminate the aberration error by any mechanism short of improved condenser optical correction. Bearing this in mind, proceed with caution when conducting color photomicrography with Abbe and aplanatic condensers.
The effects of aberration can be minimized by carefully selecting a condenser position that produces a slight fringe of red color just inside the image of the field diaphragm blades and a corresponding fringe of blue color positioned closely outside the blades. Although this will not eliminate the artifact, it will help to compensate for each color shift and produce a more neutral color balance in photomicrographs, which can be even further improved with color compensating filters. Consistent positioning of an Abbe or aplanatic condenser is important to ensure reproducible color quality in photomicrographs made with these condensers.
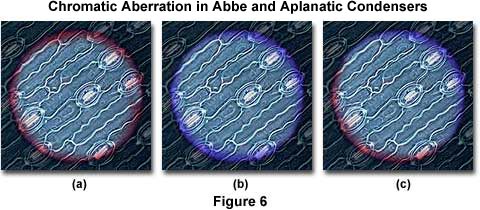
Figure 6 presents a series of photomicrographs of the field diaphragm superimposed over a stained leaf thin section made with an Abbe condenser. The photomicrograph on the left (Figure 6(a)) illustrates the condenser positioned to produce a red fringe near the field diaphragm blades, and the photomicrograph in the center (Figure 6(b)) shows the position with blue fringes near the blades. On the right (Figure 6(c)), red fringes appear on one side of the field diaphragm blades and blue fringes on the other. This occurs when either the condenser or the lamp filament are out of position with the optical axis, and is a good general test for microscope alignment.
Abbe Condenser Chromatic Aberrations
This tutorial demonstrates color fringes that occur at the field diaphragm edges as a result of chromatic aberration in Abbe condensers.
Condensers having a higher degree of optical correction (achromatic and achromatic-aplanatic) are recommended for high-quality color photomicrography. However, when it is necessary to use condensers of lower correction, be careful to maintain the condenser aperture diaphragm opening size and height in the same position throughout the photomicrography session and use color compensating filters to reduce the color artifacts caused by chromatic aberration.
Reciprocity Failure Errors - Most color films have emulsions that are designed to be exposed to light for brief periods, usually ranging from a duration between 1/500 of a second and 1/2 second. In optical microscopy, especially when light altering filters, polarizers, and prisms are added to the optical pathway as in many of the contrast enhancement modes (phase contrast, differential interference contrast, Hoffman modulation contrast, etc.), the proper exposure often is longer than 1/2 second. The film's reciprocity relationship no longer holds, and the film requires additional exposure time to yield proper exposure.
This phenomenon is called reciprocity failure, and it occurs in all color and black & white photographic emulsions regardless of film speed, dye composition, or silver halide concentration. The term "failure" only indicates that the linear relationship between exposure time and light intensity no longer holds and does not indicate a failure of the film emulsion in terms of performance. Changes in film response to microscope illumination levels are sometimes referred to as long-exposure effects and short-exposure effects. Under low light conditions (typical of fluorescence microscopy and polarized light microscopy at high magnifications), exposure times must often be extended to the point of significant film speed loss. Extremely short exposures produce the same effect. Most films also display an increase in scattering of exposed silver halide grains, the formation of smaller latent-image centers, and a lower rate of development at the latent-image centers with exceedingly short exposure times.
The film manufacturers' data sheets and characteristic curves suggest how much additional time is needed for proper exposure. Each individual film emulsion has a response tuned to a particular range of illumination values, outside of which the film's response is compromised and the reciprocity law no longer holds. Reciprocity failure can often be compensated simply by an increase in exposure times or processing conditions for black & white films, but this is not always the case with color negative and transparency films. Most color films have three color-sensitive dye layers, each of which has a slightly different characteristic curve position and slope resulting in varied responses to the reciprocity effect with the potential to cause undesirable color shifts or casts. Often, both exposure times and color balance filters must be adjusted to compensate for very long or short exposures when using color films.
In photomicrography, very long exposure times often occur due to low illumination intensity levels that result with contrast enhancing techniques such as fluorescence and polarized light, as mentioned above. In fact, exposure times exceeding five minutes are not uncommon, and usually lead to reciprocity failure. When using black & white films, calculated exposure values can lead to negatives lacking shadow detail, but compensation by lengthy exposure often yields too much density in highlight areas, resulting in an increase in overall contrast. This is due to the fact that the reciprocity failure effect is greater in regions where specimen illumination is very low, a problem that can be overcome by increasing the amount of time the film is developed.
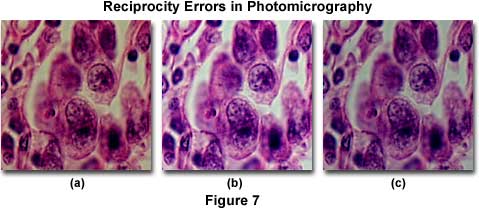
The effect of reciprocity failure in color transparency photomicrographs is illustrated in Figure 7, for a series of successive exposures of 4 minutes (Figure 7(a)), 0.25 seconds (Figure 7(b)), and 0.04 seconds (Figure 7(c)). The specimen is a thin section of human testes sarcoma stained with eosin and hematoxylin and imaged with Fujichrome 64T tungsten-balanced film processed through the Kodak E6 protocol. At very long exposure times (using a neutral density filter to reduce illumination intensity), the photomicrograph in Figure 7(a) is dark and lacking in shadow detail, typical of reciprocity failure on films exposed for several minutes. There is also a noticeable shift in color with blue tones being suppressed. By decreasing exposure time (or removing the neutral density filter), the photomicrograph in Figure 7(b) is produced, which shows sharp specimen details with good exposure results and accurate color rendition. At very short exposure times (Figure 7(c)), reciprocity failure again occurs due to insufficient exposure, and the photomicrograph is dark and lacking in shadow detail.
Neutral density filters can often be used with success in modulating very short exposure times to avoid reciprocity failure. However, care should be taken when using neutral density filters to make exposure time adjustments in color photomicrography. Older neutral density filters may acquire a slight yellowish tinge with age, and some of the cheaper filters also have some degree of background color. If the introduction of neutral density filters into the optical pathway results in incorrect color balance for a microscope that has been carefully calibrated (see Figure 3(a)), use color compensating filters to return the microscope illumination to its proper balance. Other optical factors, such as internal scattering and reflections, can affect the effective density of neutral density filters, causing them to vary from the measured density. For this reason, it is important to calibrate neutral density filters for critical photomicrography.
There are a variety of other factors that affect color balance in photomicrography when using color transparency and negative films. Color response is affected by manufacturing variations in film emulsion characteristics, such as thickness, ISO values, and color fidelity. Fluctuations in emulsion thickness are rare, but they do occur and may affect color balance in photomicrographs. The degree of variation permitted by film manufacturers is usually less than the effect of a Kodak Wratten CC10 compensating filter, making these filters useful in correcting for emulsion and ISO variations. Because emulsion fluctuations can vary in any one of the six colors (red, green, blue, cyan, magenta, and yellow), it is a good idea to have a complete set of these filters on hand.
Improper storage conditions for color film can also affect color balance, sometimes to the point of being uncorrectable with color compensating filters or altered exposure times. This is usually the case when film has been damaged by prolonged conditions of high temperature and/or high humidity, such as often occurs when color film is stored for lengthy periods on laboratory shelves. Color films are more sensitive than black & white films to temperature and humidity damage because each of the three color emulsion layers will respond differently under these conditions. The effects of improper film storage are unpredictable and may be manifested in a change of color balance, film speed, or image contrast. It is always a good idea to store film in a refrigerator before and after exposure, especially if the film will not be processed immediately.
Exposure of film to unwanted chemicals or excess light will also have a deleterious effect on photomicrographs that may be difficult, if not impossible, to correct. Film should not be stored in fume hoods or other areas where it may be subject to attack by volatile liquids and gases such as formaldehyde, acetone, or ether. The effect that any particular chemical may have on a given film emulsion is unpredictable. Film speed may increase or decrease, color balance can be dramatically affected, and contrast will usually be lost. Another laboratory hazard, especially in biochemistry, molecular biology, and medical labs, is inadvertent exposure of film to high-intensity radiation sources. These sources include cobalt-60 isotopes, radium, and X-rays that are commonly used in hospitals and some research laboratories. Baggage scanners at airports also present a radiation hazard. In order to avoid exposure of film to potentially damaging radiation sources, do not store the film in areas where radiation is being used or radioactive chemicals are housed. Protect film (both exposed and unexposed) with either lead or concrete shielding, where appropriate, and place stored film into circulation as soon as possible.
The characteristics of film emulsions change with time, so most films are stamped with an expiration date during manufacture. If properly stored in a refrigerator or freezer, the life expectancy of film can be greatly increased. Film should be placed in sealed containers (a locking freezer bag or air-tight plastic container is sufficient) and carefully stored in low-traffic areas of a freezer or refrigerator until it is ready to be exposed. After removal of film from cold storage, always allow the film to equilibrate to room temperature for several hours before opening the storage container to avoid moisture damage. When properly stored, film will often be good for periods that extend well beyond the suggested expiration date.
Photomicrographs Very Dark or Washed Out - Exposure errors can result in photomicrographs that receive either insufficient or too much illumination resulting in images that are either very dark or washed out and lacking in specimen highlight detail. The average brightness of a specimen can vary across the viewfield and often the area of interest is not representative of the average field brightness. As an example, in darkfield microscopy where the specimen is brightly light on a dark background, the image will be overexposed if the exposure meter reading is not compensated in exposure calculations. The resulting photomicrographs will render the bright specimen washed out and lacking in detail. This error can be compensated by the use of a spot meter placed directly on the bright specimen to gauge exposure time, or (if a spot meter is not available) by increasing the camera film speed indicator to decrease exposure time. A thorough discussion of film exposure is presented in another section of the Olympus Microscopy Resource Center Microscopy Primer.
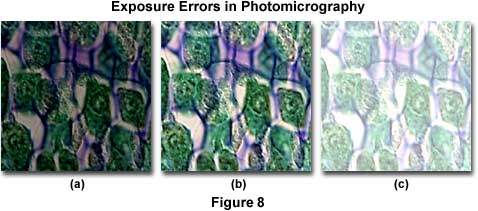
Figure 8 presents a series of photomicrographs illustrating the most common exposure errors that occur with color transparency film. The specimen is a stained thin section of zea (maize or corn) tissue photographed with a 60x dry objective with a correction collar. Proper illumination is illustrated by the central image in the figure (Figure 8(b)). Figure 8(a) shows the zea thin section when the film has not received enough light to properly expose the emulsion, and an underexposure error has occurred resulting in a very dark image. Underexposed film will leave shadowed areas too dark and lacking in detail and highlight areas are usually rendered in shades of yellow and gray. Color transparency film is not very forgiving of exposure errors and will only produce acceptable results within a half to one f-stop of the correct exposure. Typically in a microscope, the average specimen brightness may not be uniform over the entire viewfield, and details that appear as small dark features may be surrounded by a bright background. This poses problems when using cameras with automatic exposure features, which measure exposure by averaging over a 30-100 percent area in viewfield. Such averaging may cause underexposure of specimens with very bright backgrounds. Use the spot meter (if available) to alleviate this problem, or if the meter averages a larger portion of the viewfield, adjust the film speed setting to increase exposure. With manual cameras, increase the exposure time or decrease the film speed adjustment to increase exposure. It is always a good idea to calibrate new specimens and film by bracketing exposures in one-third f-stop increments. Include at least two or three exposures on each side of the median for each bracket, and maintain accurate records of such exposure tests for future reference.
The image in Figure 8(c) appears very thin and washed out due to overexposure of the film. Overexposure affects lighter portions of the film, which suffer from a significant or total loss of image detail. This error occurs because the film receives too much light, and is usually caused by shutter speeds that are too long or excess illumination intensity. Tungsten-halogen lamps (12-volt, 50- or 100-watt) should be adjusted to a setting between 8.5 and 9.0 volts for optimum photomicrography color temperature and illumination. If the entire roll is overexposed, the fault is probably in the exposure settings on the camera system. Observe the camera ISO indicator to see if it matches the film speed, and check to see if the shutter speed is correctly set. Automatic camera systems can overexpose film if their lowest setting has a shutter speed too long for the amount of illumination. Reduce illumination intensity with neutral density filters, and perform test brackets to dial in exposure settings when using new specimens or films.
Exposure and Color Balance
Explore how exposure settings and color compensating filters can be adjusted to change the contrast, brightness, and color balance of a photomicrograph.
Another common exposure problem can occur with automatic cameras when deeply colored filters are used to control contrast in black & white photomicrography. The photocell or photodiode in such cameras may not respond in a uniform manner across the visible light spectrum and yield incorrect exposure calculations, resulting in photomicrographs that are either too light or too dark. Exposure correction for filters using predetermined filter factors is discussed in the film exposure section. Always maintain accurate records of exposure information for colored filters to ensure high quality photomicrographs with the correct exposure. Automatic camera photodiodes may also be sensitive to polarization effects, commonly encountered in polarized light microscopy. Use the same strategy as with colored filters and keep records of exposure information.
Retardation plates using polarized light or differential interference contrast can also cause underexposure problems, especially when the sensitivity of the photodiode may not be uniform across the visible light spectrum or the detector is sensitive to polarization effects. Under these conditions, exposure times should be determined by experimentation using brackets around the exposure recommended by the automatic camera system. Always use brackets when photographing specimens with a manual camera.
When the film is very dark or totally black, there is a possibility that it has not been exposed. This can be indicative of a serious problem with the film advance mechanism on automatic cameras or a malfunction of the camera shutter system. If the entire roll is unexposed, yet the camera appeared to be functioning properly during photomicrography, check to make certain the camera is receiving light from the microscope. Also examine the take-up spool to make sure it is working properly and the film is correctly attached. Many automatic exposure systems will not allow film to be exposed when insufficient light is being received, but older manual systems do not have this safety feature. In film rolls where only a single or couple of frames are unexposed, check the camera to make sure film is advancing properly.