Color photography is based upon the principle that white light is composed of almost equal amounts of the three primary additive colors: red, green, and blue, and that by adjusting the mixture of these colors, all other colors can be faithfully reproduced. As a result, emulsions employed in modern color films contain three individual layers of color-sensitive dyes, each of which responds to one of the three primary colors.
Each layer of a color film emulsion absorbs a specific spectrum of visible light wavelengths, prescribed by the properties of the dyes embedded in that layer. In most color transparency films, the top layer is sensitive to blue light, while the middle and lower layers are sensitive to green and red light, respectively. Wavelengths that fall in between these divisions will react with two or more of the emulsion layers to reproduce that color when light is viewed through the processed film. Areas of the image that are black do not expose the emulsion because black does not reflect any of the three primary colors. White and highlight regions of the image expose all three emulsion layers equally (or almost so) due to the fact that white light is composed of all three primary colors.
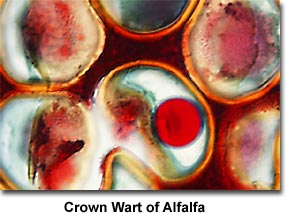
The specimen employed in this discussion is a brightfield color photomicrograph of a quadruple-stained thin section of alfalfa plant tissue that has been infected with the crown wart fungus, Physoderma alfalfae. The staining mixture consists of safranin O (nuclei, chromosomes and cell walls), fast green (cytoplasm and cellulose cell walls), crystal violet (starch), and orange G (acidophilic cytoplasm). A Kodak Wratten CC10M magenta color compensating filter was used in the light path to eliminate a slight green cast present in background of the stained specimen. The image was recorded on Fujichrome 64T color transparency film and processed using the Kodak E-6 technique at 38.3 degrees centigrade. Film was underexposed 2.5 to 3 f-stops below the time recommended by the in-camera photomultiplier and was push-processed 1.5 f-stops by extending process time in the first developer up to 35 percent in an effort to increase contrast and color saturation.
When color film is processed, the first step (first developer) is designed to reduce silver halide salts in each of the three emulsion layers into metallic silver that produces a negative image. This step is common to all color photographic materials regardless of whether they ultimately produce positive or negative images on film or paper. The next stage of processing color transparency film involves a color developer that reverses the negative image to a positive one and couples the appropriate dyes to each emulsion layer. In each layer, the dye coupled by the color developer is the complementary color to the wavelengths of light that were originally recorded by the film. For instance, yellow dye is formed and coupled to the blue-sensitive layer, magenta dye is formed in the green-sensitive layer, and cyan dye is formed in the red-sensitive layer of the film. When combined by viewing through the transparency film, the yellow, magenta, and cyan coupled dye layers add together to reproduce an image that contains all of the color relationships of the original specimen as it was photographed.
Processing color film requires considerably more effort and attention than does black & white film. Although the basic steps are similar in nature, color processes require more steps and greater temperature control than do black & white processes. The stability of chemical solutions is also a factor in color processing, because sensitive combinations must be mixed immediately prior to use to avoid rapid deterioration of the components. In general, the shelf life of diluted color process chemicals is far less than those used for black & white film processing.
Most brands of color transparency film are processed by the Kodak E-6 or equivalent Fuji CR-56 color processing system of chemicals. The exception to this are the Kodachrome films, which require a specialized proprietary Kodak process (K-14) that involves three separate color developers and re-exposure to light through colored filters to form coupled dyes in the emulsion layers. The processing steps are identical for all E-6 type processes and include a first developer, reversal bath, color developer, pre-bleach, bleach, fixer, final wash, stabilizer, and drying. Provided temperature control can be established (a constant 38.3 degrees centigrade +/- 0.1 degree), this process can be conducted in the laboratory using small daylight developing tanks, or if the expense account allows, more complex motorized rotary-tube film processors with built-in water baths and temperature control. Commercial roller-drum tank units for processing color transparency film are available for under $1000. Truncated E-6 process kits that simplify the process by combining several of the steps are also available for amateur photographers. These simplified processes contain a first developer, color developer, combined bleach and fixer, and a stabilizer bath. Although they also require strict control of temperature, the aftermarket "hobby" E-6 kits are much easier to use and do have somewhat more temperature latitude than do standard E-6 processes.
The first developer is the critical part of the E-6 (or hobby kit) process, and it is essential that the temperature be held to within the specified limits. Contrast can be increased by addition of 3.0 grams of phenidone (commercially available at photographic chemical distributors) per liter of first developer. The additional contrast obtained from addition of the phenidone dramatically helps capture what is seen in the microscope eyepieces. In many instances, the processed film has either an overall yellowish-green or magenta cast after drying. This can be eliminated by adjusting the pH of the color developer. The optimum pH given by Kodak for the E-6 color developer is 11.1, but by increasing the pH by 0.2 to 0.7 units, any extra magenta can be chemically subtracted; by reducing the pH by the same amount, the yellowish-green cast can be eliminated. E-6 hobby kits can be used to develop 16 rolls of film with 24 exposures in the magazines. As the solutions age, extended processing times are necessary to achieve the desired effects. Details on the time increases are given in an instruction booklet supplied with the kit. It is probably better to add one to two minutes to the color developer time given and about five minutes to the bleach/fixer time to insure adequate bleaching of unwanted dyes.
By extending the time in the first developer by approximately 30 percent, one can push the process by one f-stop. This maneuver is very tricky, and it is advisable to experiment with non-valuable film during the initial setup for push-processing. However, the results are often worth the extra effort. Pushed transparency film often displays dramatic color saturation effects and a crispness often lacking in films processed by the standard E-6 method.
Too much time in the first developer will definitely lead to an increase in grain size and the transparencies will lose a significant portion of their overall density. Films that are push-processed should be underexposed by one or several f-stops. It is a good idea to bracket a set of photomicrographs in the same viewfield to determine the precise number of f-stops to underexpose the film. Push-processing will increase contrast and also color saturation at the cost of a small sacrifice in D-max, the overall film density. Too much underexposure will leave the processed transparencies very dark and dense. By carefully monitoring a bracket composed of exposures at every half or third of an f-stop, the optimum underexposure can be easily determined.
![]() Examination of processed color transparencies is an important step in evaluating the results of photomicrography experiments. The first step is to carefully check the transparencies for proper exposure and errors that may have been introduced by color balance, heat reducing, neutral density, and compensating filters. A properly exposed and processed color transparency of the alfalfa specimen is illustrated in the photomicrograph to the left. Exposure is even across the emulsion, details are sharp and have excellent contrast, and there are no obvious flaws arising from either photomicrography or processing errors. Transparencies that are very dense and dark have been underexposed, a condition that occurs when too little light reaches the film plane. This is not a film processing error, but rather demonstrates incorrect use of the microscope. Another common photomicrography error with transparency film is overexposure, where the film density is very thin because too much light has reached the film. These and other color transparency film errors are thoroughly discussed in our section entitled Troubleshooting Color Transparency Film Errors, which describes common errors encountered in photomicrography using this type of film.
Examination of processed color transparencies is an important step in evaluating the results of photomicrography experiments. The first step is to carefully check the transparencies for proper exposure and errors that may have been introduced by color balance, heat reducing, neutral density, and compensating filters. A properly exposed and processed color transparency of the alfalfa specimen is illustrated in the photomicrograph to the left. Exposure is even across the emulsion, details are sharp and have excellent contrast, and there are no obvious flaws arising from either photomicrography or processing errors. Transparencies that are very dense and dark have been underexposed, a condition that occurs when too little light reaches the film plane. This is not a film processing error, but rather demonstrates incorrect use of the microscope. Another common photomicrography error with transparency film is overexposure, where the film density is very thin because too much light has reached the film. These and other color transparency film errors are thoroughly discussed in our section entitled Troubleshooting Color Transparency Film Errors, which describes common errors encountered in photomicrography using this type of film.
In many instances it is difficult to distinguish between errors that occur during processing and those that arise as a result of mishandling the microscope. Some errors are extremely subtle in nature, such as small contrast discrepancies and unusual density shifts, but others are often blatant. A variety of the most common errors encountered in color transparency film processing are discussed in the paragraphs below with accompanying illustrations derived from photomicrographs of the specimen described above.
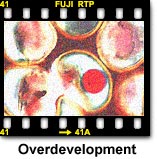 Overdevelopment with transparency films in the E-6 process leads to very thin and washed-out photomicrographs that have lost highlight detail and experience increased grain size. This error can occur when film is left in the first developer for more than the recommended time, even when specifically intended during push-processing (which, by its nature increases grain size). The same effect will occur if the temperature is too high or the agitation is too vigorous. Carefully monitor the water bath temperature during the E-6 process, especially when using the first developer solution. The temperature should remain at 38.3 degrees Centigrade without any significant deviation to avoid process errors. Other bath temperatures (color developer and bleach/fixer) are not as critical and can afford a few degrees of fluctuation.
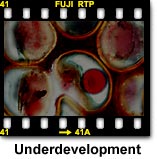 Underdevelopment when processing color transparency film using the E-6 method leads to very dark and dense film, often associated with a blue cast, muted highlights, and lacking in shadow detail. Typically, when the first developer time is cut too short, resulting transparencies appear obviously underdeveloped and do not transmit a great deal of light. Another cause for underdevelopment with color transparency film occurs when the water bath temperature falls below the recommended level of 38.3 degrees Centigrade. The E-6 first developer step is so sensitive to temperature that even if the drop is only 0.5 degrees, there will be a noticeable increase in film density. It is a good idea to pre-heat both the first developer (and other processing solutions) as well as the developing tank for at least 15 minutes prior to initiating film processing. Similar results are obtained when the film is insufficiently agitated during the development process. The first developer must be poured into the developing tank very quickly and agitation must start immediately. Underdeveloped film should be carefully examined on a bright (5500 K) light table to determine if it is salvageable. The only positive aspect of underdevelopment is that a definite increase in color saturation will be seen in the dense film. Often, if the light is bright enough or exposures are lengthy, satisfactory prints can be made from underdeveloped transparency film. There is also the possibility that underdeveloped film can be restored, at least to a certain degree, with chemical dye reducer.
 When every frame in a transparency filmstrip has been only partially developed, then one edge of the entire roll will appear much darker than the opposite edge. This occurs when there is not enough first developer solution in the processing tank to completely immerse the film. To avoid the problem in the future, carefully measure the volume of liquid necessary to cover all film reels inside the developing tank and use this measurement to adjust developer solution volumes in subsequent processing sessions. Roller drums that are not properly filled will produce partially developed film frames positioned at only one end of the strip, nearer the center of the film reel. Film that has been only partially developed is permanently damaged and will not produce good prints unless enough of the image remains to allow satisfactory elimination of undesirable areas by cropping.
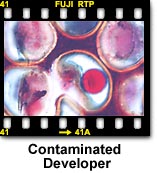 Unusual or unrealistic color casts or an obvious lack of color balance is often the result of a contaminated first developer solution. The source of contamination could range from unclean processing equipment (developing tank, graduated cylinders, mixing bottles, etc.) to mistakes mixing the processing chemicals. It is a good idea to use the same mixing bottles for each solution, even through they are washed out at the end of the processing session. By carefully labeling each bottle, mistakes are kept to a minimum. First developer solutions that have been diluted to working volume, then left for lengthy periods of time before use, can also produce strange color shifts in addition to underdevelopment. Even when the process temperature is raised to compensate for aged chemicals, reactions in the film emulsion during development with old solutions often leads to disastrous results.
 Totally black film with no edge marking numbers or letters is usually the result of omission of the bleach/fix stage, but could also result if the first development is forgotten or color and first developer are switched. This error is easy to differentiate between unexposed film, which is also black, but will display yellow or white edge numbers. If the film has been processed successfully through the first and color developers, there should be some detail present when examined through a bright light, such as a fiber optics illuminator. Hold the transparency up to the illuminator, and examine the surface with a 10x loupe. Some detail should be visible (although very dark), which may indicate that the film can be salvaged by processing in the bleach/fix solution. If extra solution is available, there is nothing to lose by attempting to properly bleach the dyes and fix the transparency film, even if it has gone through a wash and drying cycle. However, if the film was placed into an aldehydic stabilizer bath prior to drying, then it is pointless to try and bleach unwanted dyes, which are now chemically fastened to the emulsion. There is no point in trying to recover the film if the first development stage is omitted or if the color and first developer are switched.
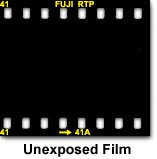 When the film is very dark or totally black, but edge markings are present and have been properly developed, there is a possibility that the film has not been exposed. This can be indicative of a serious problem with the film advance mechanism on automatic cameras or a malfunction of the camera shutter system. If the entire roll is unexposed, yet the camera appeared to be functioning properly during photomicrography, check to make certain the camera is receiving light from the microscope. Also examine the take-up spool to make sure it is working properly and the film is correctly attached. Many automatic exposure systems will not allow film to be exposed when insufficient light is being received, but older manual systems do not have this safety feature. In film rolls where only a single or couple of frames are unexposed, check the camera to make sure film is advancing properly.
 If transparency film is inadequately bleached, the result is very dark images that are severely lacking in contrast. Often, film that has not received enough time in the bleach solution will have an overall red cast or small red spots on the emulsion. Another indication of inadequate bleaching is the presence of a grayish-brown fog on highlights with corresponding shadow detail that is lacking or too dark. This is due to retained silver salts that have not been removed by the bleaching chemicals, either because of insufficient agitation, process time, or a depleted solution. In many cases, bleaching errors can be corrected by rolling the film back onto reels and re-bleaching the entire roll. This remedy will only work if the film has not been subjected to fixing in the stabilizer bath.
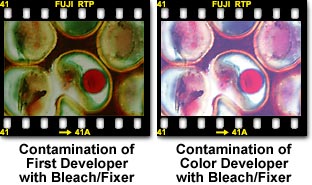 If the film is fixed before bleaching or if bleach/fix solution contaminates the first or color developers, then color balance, tonal qualities, and overall film density will be compromised. Contamination of the first developer with bleach or fixer will render color tones a bluish color and may reduce or increase film density, depending upon the concentration of the contaminant. In fact, any contamination of a developer with another solution usually results in a color shift and reduced color density. Subjecting the film to fixing prior to the bleach step prevents removal of the silver complexes normally formed during bleaching. In this case, film can often be recovered by bleaching for the recommended period (or even extending bleach processing time by 25 percent), followed by fixing, then washing and stabilization. Small amounts of bleach/fixer in the color developer solution will also result in bluish color tones that are impossible to cure.
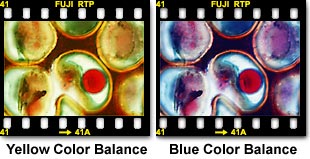 An overall blue or yellow color balance in transparency film processed by the Kodak E-6 method can be caused by incorrect color developer alkalinity (pH too high) or improper mixing of the color developer. To adjust the color developer pH level, add small amounts of 5 Normal (Molar) sodium hydroxide to correct a process that produces a blue color balance. If the process results in a yellow color balance, add small aliquots of 5 Normal sulfuric acid. Each milliliter of concentrated sodium hydroxide solution is approximately equal of 0.05 density units (equivalent to a CC05Y filter) of yellow added to correct the color balance. Likewise, each milliliter of concentrated sulfuric acid solution is approximately equal to 0.05 density units (equivalent to a CC05B) of blue added to correct the color balance.
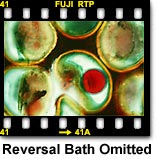 Green shadows or an overall green color balance is a good indication that the reversal bath (second step in the E-6 process) is either omitted or the solution is exhausted. Because this error is usually only discovered after the film has been completely processed, it is generally irreversible. Green color density can also be a sign that the first developer and/or color developer have been contaminated with stabilizer, another irreversible error. Careful attention should be paid to all steps in the E-6 process, particularly with respect to chemical solution replenishment. Kodak provides detailed instructions for replenishing each solution in the E-6 process, and the company also gives recommendations for adjustment of solution alkalinity in unreplenished processes.
 When processed transparency film appears as a color negative with high contrast, then it may have been processed in color negative chemicals by mistake, or the first developer may have been inadvertently switched with the color developer. Color negative films or non-substantive reversal films will not have suitable images when processed in E-6 chemical solutions. Both kinds of reversal film (substantive and non-substantive) produce black & white negatives when they are processed with developers such as D-76 and fixed with classical fixing solutions designed for black & white films. Negatives produced in this manner will have an overall stain ranging in color from gray to dark brown, but they can still be printed on panchromatic bromide or polycontrast resin coated paper to produce black & white prints. Ektachrome and Fujichrome type film that has been turned into black & white negatives should be given a bleach bath to restore the halide content to the film emulsion. In this case, standard E-6 bleach should not be used because it totally removes the silver, which will prevent the film from being re-developed in color developer. The film should then be color processed normally to convert it into standard color negatives.
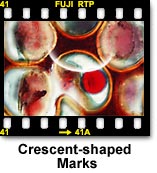 Dark or light crescent-shaped marks (or "half-moons") can appear anywhere on the transparency, including near the take-up spool sprocket perforations, and are due to mechanical wrinkling or creasing of the film. This error usually occurs during loading of film into the tank prior to processing or during removal of processed film from tank reels. The size of the mark is an indication of the severity of damage to the film base, especially when some of the emulsion has been removed. If the damaged area does not cover the entire image section of the film, it may still be possible to get a usable print by cropping to include only good portions of the film during printing.
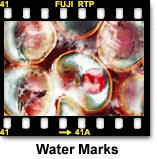 Water marks are light or dark gray spots that occur when water containing a significant amount of dissolved salts (hard water) dries on the emulsion surface. Careful use of hypo clearing agent or similar wetting agents followed by squeegeeing the film will help alleviate this problem, but will not guarantee a cure. Spots having a dark outline are caused by water coming into contact with the film surface after the emulsion has dried. This mistake usually occurs during cutting and packaging of the film and can be avoided by careful handling of film after processing and drying. Water marks can often be removed with film cleaner without compromising the integrity of the emulsion surface.
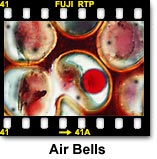 Air bells are circular dark spots that form in regions where the film developer was unable to reach the emulsion as a result of air bubbles clinging to the surface. The easiest way to avoid air bells is to gently tap the developing tank on the laboratory benchtop just after the developing solution has been added. In addition, the developing solution should be agitated according to the manufacturer's instructions during processing to dislodge any air bubbles that subsequently form on the film. On some occasions, air bells appear reddish or blue when they occur during fixing.
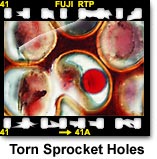 Torn sprocket holes can be an indication of a serious problem with the camera or darkroom procedures. Generally, damage to sprocket holes (the perforations used by the takeup spool to advance the film) occurs because of a problem in the camera advance mechanism. Frequently, the problem is caused by rewinding the film by force without first engaging the rewind mechanism (a button on the camera body). Another common cause of torn sprockets is trying to forcibly advance film after the end of the roll is reached. In many instances, the film is torn off the spool, compounding the problem. When the film has been mishandled during loading or unloading of the developing tank, damage to sprocket holes can also occur. This is because film is usually loaded into spiral grooves in a plastic or metal spool before being placed in the development tank. If the film is forced into the grooves or rapidly extracted, some damage can occur if one of the sprocket holes becomes caught in the reel or spool. To investigate this type of damage, carefully examine the camera back to determine if the problem lies with the takeup reel or some other portion of the film advance mechanism. If not, then review darkroom technique to see how it can be improved.
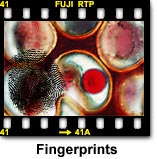 The presence of contaminating fingerprints on the emulsion will be obvious and is usually destructive to the film. Touching dry film with moist fingers is the usual source of this problem, but it can also occur during processing when the wet and soft emulsion surface is accidentally handled. If the fingerprints are due to developer solution, then resulting marks will be light and usually impossible to remove. When the marks are caused by touching the film with fingers that are wet from fixer chemicals, then darker colored fingerprints will be left on the emulsion that can sometimes be removed by thorough washing. To avoid fingerprints on film surfaces, rinse and dry hands after they have been exposed to chemical solutions and handle film by the edges, not the surface. Fingerprints due to grease and oils can sometimes be removed by rewashing film and treating it again with a wetting agent, or by cleaning the film with a cotton swab or film cleaner. Handling film with cotton editing gloves will avoid fingerprint problems.
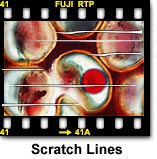 Long thin scratches that run parallel to the length of a filmstrip are caused by tears and partial removal of the emulsion by mechanical force. This usually occurs during squeegeeing, but can also occur in the camera back or during processing. Check the film pressure plate on the camera back for damage or raised areas that might be scratching the film as it advances or rewinds. If the film has been forcefully loaded into the developing spool, sometimes the emulsion is rubbed too hard against the spool, causing blemishes. Film bulk loaders are often the source of scratched film, but this is usually not obvious until the film has been processed. If the error occurs repeatedly, then carefully examine film loading and darkroom technique to uncover the source of the problem. Film that has been damaged in this manner cannot generally be repaired, but one remedy (for printing and scanning purposes) is to gently rub some skin oils (from the forehead or nose) into the scratches for a quick fix. Eventually the oil will collect dust and should removed with film cleaner before storing the transparencies.
![]() Large blank spots or patches on the emulsion surface are usually opaque to very dark in shade when viewed on transparency film. Occasionally, blank patches will appear clear on the transparencies, creating undesirable light spots on resulting prints. The usual cause is two loops of film that have stuck together in the spool or reel during development. Often, to conserve space in developing tanks, photographers will stack several filmstrips together in the same reel, or will inadvertently wind two loops together on stainless steel reels.
Large blank spots or patches on the emulsion surface are usually opaque to very dark in shade when viewed on transparency film. Occasionally, blank patches will appear clear on the transparencies, creating undesirable light spots on resulting prints. The usual cause is two loops of film that have stuck together in the spool or reel during development. Often, to conserve space in developing tanks, photographers will stack several filmstrips together in the same reel, or will inadvertently wind two loops together on stainless steel reels.
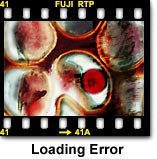 Squeezing reels too tightly in the developing tank can also cause film to overlap and touch. When this occurs, developing solution is prevented from reaching the film emulsion at the point of contact, and the film will not be adequately processed. In most instances, the affected area will remain totally unprocessed and opaque, but can become clear if the film separates later in the development process. To avoid the problem, check to ensure film is winding correctly on the reel, and listen for crackling or other unusual sounds when loading film reels in the darkroom. If the winding doesn't proceed smoothly, unwind the film and start over again.
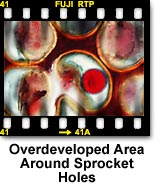 Repetitive streaks originating from the sprocket holes and traveling down into the emulsion are caused by too much agitation of the developer solution. The primary goal of agitating the first developer solution is to ensure an even spread across the film surface and to continuously replenish depleted chemicals in the area immediately adjacent to the emulsion. Excessive agitation can force too much fresh developer into contact with the emulsion, causing an overdevelopment problem. The solution to this processing error is gentle, yet sufficient agitation of the film according to the manufacturer's specifications during processing. Overdeveloped film is often damaged beyond repair and should usually be discarded. Exceptions do occur however, and film that is not too overdeveloped can sometimes be printed satisfactorily.
 Uneven development is manifested by dark patches and streaks on the transparency film and is caused by insufficient agitation of the film developing solution. When the agitation level is not high enough, depleted chemicals near the emulsion surface are not replenished in time to complete the development process and can accumulate and slide across the film. This retards film development in large areas causing streaks that compromise the integrity of the transparencies. Although film that is streaked cannot be repaired, future development sessions can be successful if the manufacturer's recommended agitation rates are followed. Transparencies that have been streaked by uneven development usually yield unsatisfactory prints, but if the affected area is small, then judicious cropping can often produce a reasonable print.
 Cloudy film, a milky texture that occurs across the entire emulsion surface, is probably due to inadequate bleach/fixing or contamination of mixing vessels or processing equipment. This error is also common when one of the developer solutions is contaminated with another solution. When the film is first removed from the developing tank, it should be carefully examined for processing errors. If the film appears cloudy, immediately place the film back into the development tank and load another batch of fixer or bleach/fix solution. Agitate for approximately five to ten minutes and reexamine the film. If it still appears cloudy, then the fixer is depleted or too old and should be replaced. There is plenty of time to prepare a fresh batch of fixer while the film is kept immersed in water. On some occasions, film that appears fogged or cloudy may have been permanently damaged by light leaks, heat exposure, or irradiation by X-rays at airport checkpoints. Laboratories that use radioactive chemicals capable of gamma radiation should also store and use film in locations far removed from radioactive chemical work areas.
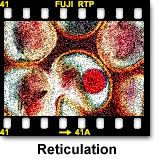 Reticulation occurs when film is exposed to extreme variations in processing temperature. The transparency image appears "crinkled" or cracked throughout the surface and is damaged beyond repair. This error usually occurs when heated first developer is inadvertently placed into the developing tank immediately after mixing. If the color developer bath is too warm, reticulation can occur to a lesser degree. As the degree of reticulation is reduced (by using cooler solutions), the cracked surface is no longer a problem, but film grain size often becomes increased. The solution to this problem is to carefully monitor the temperature of all solutions used in the development process. On rare occasions, reticulation can lead to production of prints with some degree of artistic merit, but most film damaged in this manner yields unsatisfactory prints.
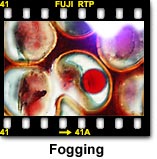 Fogging is the result of a light leak, either in the film development tank, darkroom (light leaking through the door, an inadequately blocked window, or a safelight), or in the camera back. Usually several frames are destroyed by fogging, but not the entire roll. Check all potential problem areas to ensure the mistake is not repeated with the next roll. Light leaks in the development tank can occur because the lid is not properly secured, or because the light-tight solution tube that runs through the center of the film reels is not seated properly. In rare cases, development tanks are cracked when they are slammed against the counter to dislodge air bubbles. Darkroom light leaks can be detected by turning off the lights and waiting for 15 minutes, allowing the eyes to become accustomed to the darkness before checking around door and window edges.
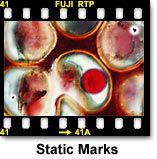 Static marks occur when film is unrolled too quickly in a darkroom under conditions of extreme low humidity, usually during the winter season. They appear as scratches, spots, or lightning-like black lines caused by static electricity that is prevalent in dry conditions. Static marks can also be caused inside the camera back or in bulk loaders when film is advanced or rewound too rapidly in dry weather. To avoid this problem, always take precautions when loading or unloading cameras and developing tanks when the relative humidity drops below 35 percent, especially in high pressure areas. Film, whether processed or unprocessed, should always be handled carefully using cloth gloves to avoid static discharge and other forms of mechanical and chemical damage.
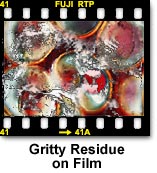 Grit and dirt on the transparency surface is usually caused by inadequate washing or improper use of wetting agents. Make certain that wash water circulates well and is replenished often, and that wetting agents are properly diluted (they can leave a residue when used too concentrated). Damp film readily attracts dust and dirt, so thoroughly dry film before handling. Areas that have extremely hard water are prone to this type of problem. Filtering water before using it for photography processing is always a good idea, but in areas with hard water, it can become critical. Mix commercial wetting agents with distilled water for the best results.
It is important for any photomicrographer to develop good basic photographic skills. The high cost of commercial photography can be avoided if all film magazine loading and processing is done in the laboratory. By paying attention to all of the details, good photomicrographs can become a matter of routine.